
SIMPLE LEATHER BRACELET

Materials
Mykonos cast hook and eye clasp set
Mykonos Charm (optional)
7" 6mm leather cord (or length to fit wrist)
2 x 14" pieces copper wire 18SWG/16AWG
1 large hole bead
Flat/round nose pliers
Wire cutters
LOS
Clear Epoxy adhesive
6mm mandrel/knitting pin/leather scrap
1 large hole bead
Flat/round nose pliers
Wire cutters
LOS
Clear Epoxy adhesive
6mm mandrel/knitting pin/leather scrap
.JPG)
Step 1
Take one piece of wire and wrap around your mandrel 10 times making sure it's not too tight so that you can remove the wrapped piece from the mandrel and get it onto the leather.
Step 2
Using round nose pliers take the end of the wire and begin turning a coil in the wire. Transfer to flat nose pliers and continue coiling until you have 3 rings.
Step 3
Continue wrapping the wire around the mandrel until the coil is level with it. Press the coil flat against the wrapped wire as shown. Trim the tail end of the wire on the underside with the coil on top.

Step 4
Repeat steps 1 to 3 to create a second piece that mirrors the first.
Step 5
File or sand out any tool marks and use LOS to oxidise both pieces together with a jump ring if you're using a charm. polish back with wire wool, tumble or polish.

Step 6
Thread the bead onto the leather and thread a copper element on either side. Make sure the focal element is centred then gently press the ends of the wires on the underside into the leather to stop any movement, taking care not to mar the leather on top.
Thread the bead onto the leather and thread a copper element on either side. Make sure the focal element is centred then gently press the ends of the wires on the underside into the leather to stop any movement, taking care not to mar the leather on top.
.jpg)
Step 7
Use epoxy adhesive to glue the closure fittings onto the leather taking care to line the hook and eye up. Leave to dry.
Use epoxy adhesive to glue the closure fittings onto the leather taking care to line the hook and eye up. Leave to dry.
.jpg)
Step 8 - Optional
Use the jump ring to attach a charm to the eye section of the clasp.

And that's all there is to it...
I actually decided that this particular charm was a little too large and I left it off so this is my finished bracelet...


I've been wearing this since I finished it and it's very comfortable. I really like it as it is but if you want to add a charm there are smaller versions available like these cute little shells.

Supplier list
Mykonos components - The Artisan Bead Compan
6mm leather cord - Cords and Wires
Lampwork Bead - Studio Juls
Copper wire - Wires.co.uk
Happy creating!
FLOWER TENDRIL EARRINGS
Spring is definitely here in the UK and flowers are popping up all over so today I thought I'd share a tutorial for these quick and easy flower tendril earrings.

To make these you will need two 8" lengths of 19/20 gauge wire, 2 flower beads or similar flat disc beads with reasonably small holes and 1 pair of ear wires. You'll also need a hand torch, wire cutters, round and needle nose pliers, looping pliers or other round tool and a file.

Please excuse the state of my hands in these photos - much neglected at the best of times and not helped by my thumb having a mishap with a door hinge at the weekend!
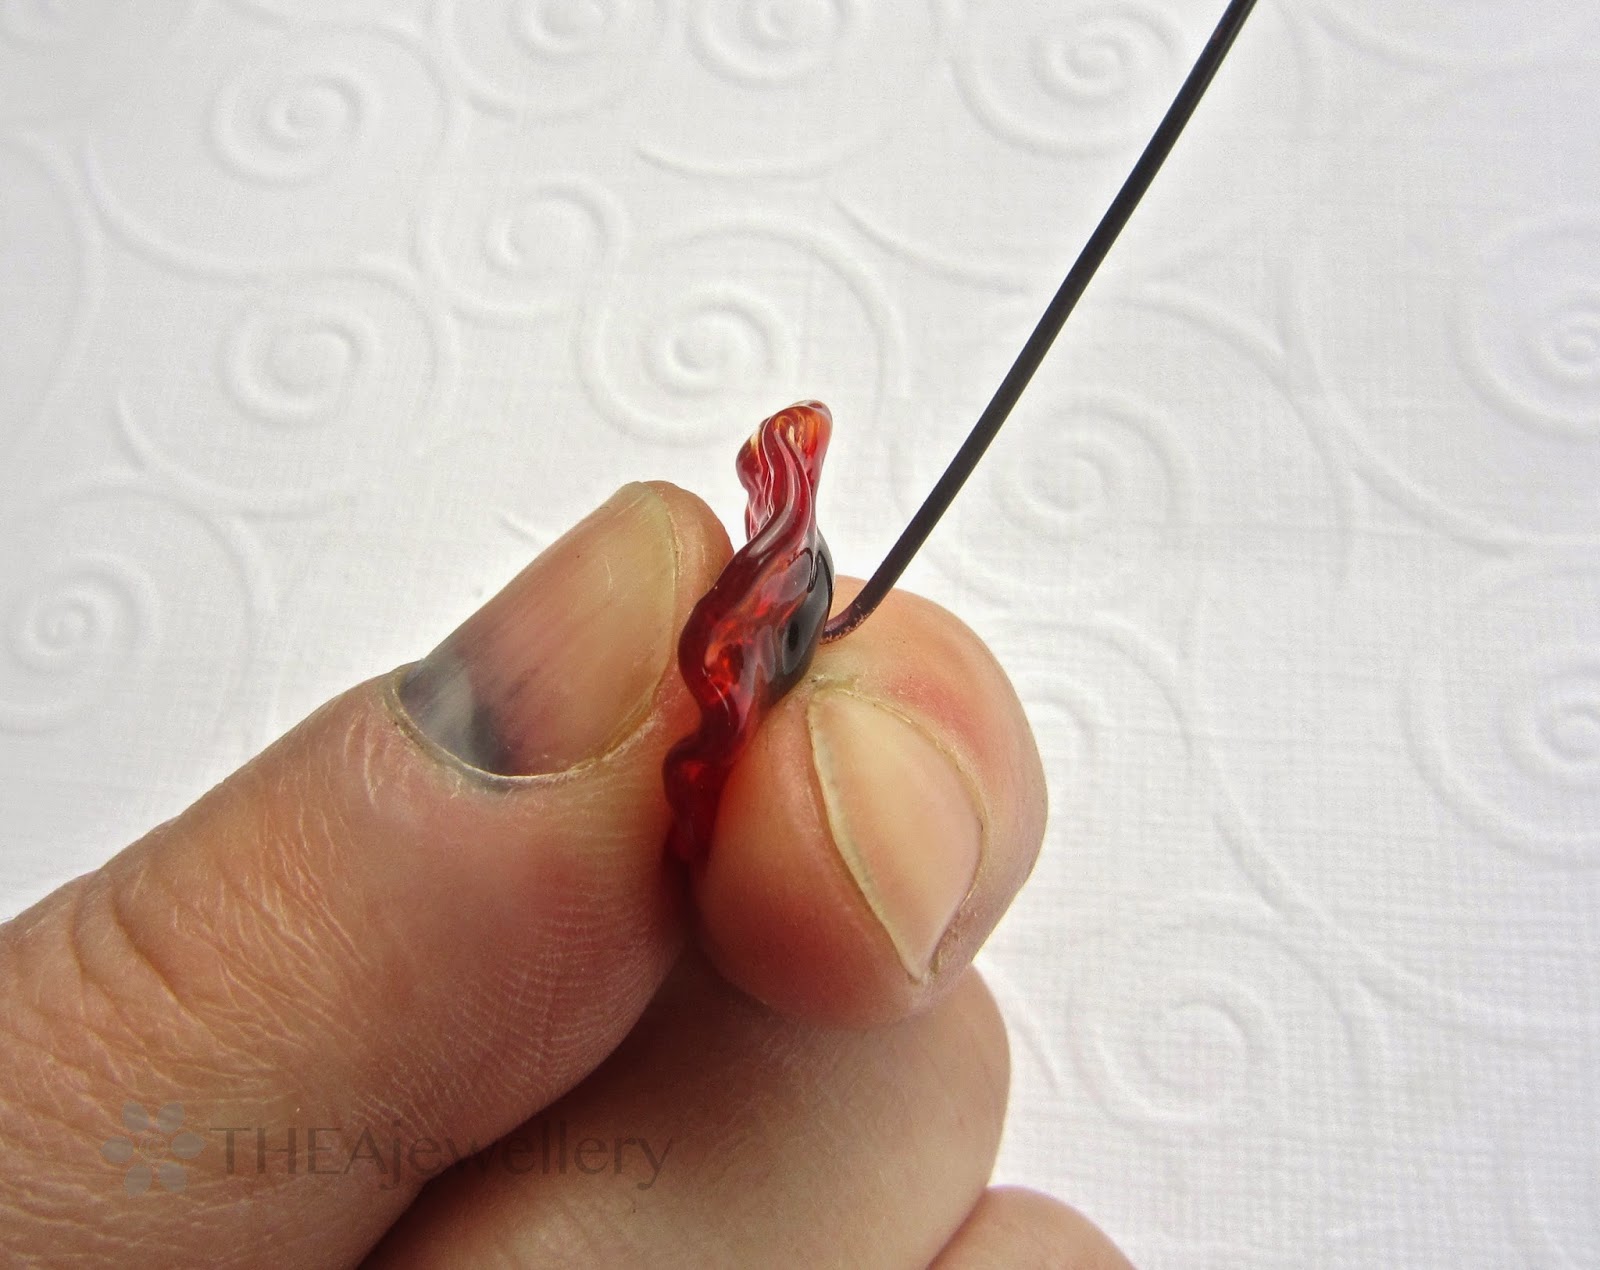
Step 1
Using the hand torch ball up the ends of the wires so that they won't pass through the holes in the beads. You can find a tutorial for doing this here. This should also soften the wire and make it easier to bend. I've left the fire stain on the wire but you can clean them up at this point if you want to.

Step 2
Pass a wire through the a bead from front to back and with your thumb on the ball at the front bend the wire up and press gently against the back of the bead.
Step 3
Where the wire comes out of the back of the bead bend it into a loop using looping pliers, mandrel or a round object like a sharpie marker.

The loop should be visible above the top of the bead.

Step 4
Take the end of the wire and pass it between the bead and the loop over the wire where it comes through the bead then gently pull it down to form a vertical tail. Keeping your thumb pressed at the point where the 2 wires meet while wrapping will help ensure the wire is snug.

Step 5
Trim the excess wire to 2 1/2 to 3 inches from the bead centre, file the end flat and remove any burrs.

Step 6
Using round nosed pliers make a turned loop at the bottom of the wire and then continue winding the wire up the pliers towards the jaws until you get to the bottom of the bead.

Step 7
Remove the round nose pliers and you will have a graduated coil. Use the needle nose pliers to bend the coil down so it sits vertically beneath the bead and loop.

Step 8
Insert the needle nose pliers into the loop at the bottom of the coil and grip the wire. Holding the bead and loop between forefinger and thumb to avoid stressing the bead, pull firmly but gently on the wire. The coil may open up nearest the bead at first and which point it may help to hold the wire there while pulling further on the lower end. Close up the loops at the bottom of the tendrils and file/polish out any tool marks.


Step 9
Repeat steps 1 to 8 to make the second earring and then use your pliers to gently adjust the coils to roughly match if necessary.
Step 10
Add your ear wires and treat with any desired patina and there you have your finished earrings!

All the beads used in the earrings shown here are from Mermaid Glass.
Hope you enjoyed this tutorial and feel inspired to try it yourself.
Braided bead rope

A couple of months go I made this necklace for a design challenge I was co-hosting and one of my AJE team mates asked me if I would write a tutorial for the braided rope element, so that's what I'm doing for you today. In my design the rope elements are attached to a simple focal bead section by means of decorative links but it is easily adaptable for you own necklace and bracelet designs.
To make the braided elements for a necklace of this style you will need:
Seed beads of your choice
2 decorative rings/connectors
2 bead cones/caps
20 gauge wire
Bead thread
Glue
The seed beads I used were size 10/0 (2.2mm by 1.5mm) opaque Aztec gold and aged striped picasso mix Czech glass seed beads which came in hank of twelve 12 inch strands - approx. 18 beads per inch from Beads and Babble on Etsy.

Step 1
For each plaited element I used 3 strands from the hank. If you can remove the strands in their entirely and the thread is strong enough you may be able to use them as they are are without restringing but I prefer to restring them onto new thread with a collapsible beading needle...

Step 2
When your have your strands threaded pass one end through your decorative ring or connector.

Step 3
Tie the ends of the thread together taking care not to pull it too tightly - the strands need to be loose enough to braid and for the final rope to be able to drape softly. Add a dab of glue to the knot, leave to dry and trim the thread.

Step 4
Repeat steps 1 - 3 twice more so that you finish up with 3 strands threaded through your rings/connectors and closed into loops. Make sure each loop is separated and not tangled and that the knots are at the opposite end for your rings/connectors.


Step 5
Start braiding by taking each looped strand over the previous one and keeping an even tension that creates a pleasing effect - how tightly you braid will affect the length and drape of the finished
element.

Whilst braiding make sure you keep your knots at the end of the loops.

Step 6
when you get to the end of the braid lay each strand on top of each other lining up the knots as closely as possible.

Step 7
Take your wire and create a loop as you would if you were making a wrapped loop.

Step 8
Slip the wire through the beaded strands and gently ease the bead thread into the loop at the point where they are knotted. Leaving some slack when stringing your beads will help here.

Step 9
Using your pliers to hold it, wrap the end on the wire around the loop 3 times to close it and trim the excess from the wrapped end of the wire.

Step 10
Thread the other end of the wire through your bead cone or cap taking care to ensure the knots are enclosed and the strands are hanging correctly.

Step 11
Create another wrapped loop with the wire extending from the bead cone/cap and adjust the cap to fit.
Step 12
Repeat steps 1 - 11 to create your second braided element and then add a clasp of your choice.

And there you are - job done!
 |
| Ceramic beads by Blueberri Beads, Bronze connectors by THEA Elements |
As
an alternative to the decorative rings/connectors you can also use this
technique with bead cones/caps at both ends of the braid.
I hope you enjoyed this tutorial and I look forward to seeing it in some of your designs.
Lesley Watt
20 November 2013
Wire Macrame Earrings

Materials
Approx. 6" 0.9mm bronze core wire
Approx. 12" 0.5mm bronze knotting wire
2 focal beads
2 accent beads/dangles
1 pair of earwires
Headpins/wire
2 pairs of pliers
Table vice or something to secure your wire
Note: Different types and gauges of wire can be used for this and these will give different effects but remember that you may need to adjust the length of the wire according to the gauge used. The basic knotting technique can also be found here.
Step one
Secure your core wire to something that will keep it firmly in place - I use a table top vice but you could also wrap it round a rigid object - don't forget to cut extra wire if you do the latter.

Step 2
Place your knotting wire beneath the core wire and bring both ends up around the sides. Pass the wire on your left over the wire in your right and back under the core wire and up through the loop of the wire on the right.


Grip both ends of the wire with your pliers and pull to tighten keeping an even tension. Don't be tempted to do this with your hands (especially with bronze wire) - it may not hurt at first but you'll find you have very sore fingers the next day - I know I tried!

Step 3
Repeat step 2 taking care to pass the wire in the same direction as this will create the spiral pattern.


Continue repeating step one and the spiral pattern will begin to emerge...


Step 4
When
the spiral is the length you want remove it from the vice and wrap one
end of the wire around the core wire 3 times, cut off the excess and
press against the core wire. Repeat the process with the other end of
the wire wrapping it over the first wrap. Trim the excess and file any
sharp edges. This will form the top of the earring.


Step 5
Trim the top end of the core wire to remove any vice marks, file the end and turn a simple loop. Gently push the spiral up to sit snugly against the loop.

Step 6
At the other end add your focal bead, trim and file the wire and turn another simple loop or warp a loop if preferred.


Step 7
Add a headpin to an accent bead and turn a simple loop to create a dangle then add this to the bottom of your earring.

Step 9
Add an earwire of your choice.

Step 10
Repeat this process for the second earring to complete the pair.

Step 11
This technique is greatly enhanced by oxidising the wire and polishing back the high points to give added depth and texture. I've done this when the earrings are complete but if your beads are not waterproof you will need to treat the wire before you make up the earrings.

Lesley watt
April 2013
Double Strand Seed Bead and Jump Ring Bracelet
(Goddess Bracelet)
All measurements and quantities are approximate and may vary depending on the materials used. This example is for a bracelet of 7½" with a beaded section of 6¼". This bracelet can be easily adjusted to fit by adding or removing beads and jump rings.
Materials
1 button
30" waxed cotton/linen cord or supple stringing medium of your choice
68 size 5 or 6 (4 - 4.5mm) seed beads + extra for the tail decoration
68 5mm (id) jump rings - to avoid snagging make sure all the jump rings are closed before you start constructing your bracelet.

Thread the cord through the button holes and draw it through to create two cords of equal length.

Step 2
Tie an overhand knot close to the button.

Step 3
Thread a bead onto one cord and then thread a jump ring over both cords.

Step 4
Thread a bead onto the second cord and thread a jump ring over both cords. Continue threading beads onto alternate cords interspersed with jump rings threaded over both cords.

Step 5
Continue until the 68 beads are threaded finishing with the last bead on the opposite cord to the first bead.

Step 6
Tie an overhand knot close to the last bead and a second overhand knot to create a loop to fit over your chosen button.

Step 7
Thread the extra beads onto the tails and knot to secure. Trim any excess cord.

Step 8
Sit back and admire your finished bracelet!

This technique can be adapted for use with necklaces using your preferred attachment technique. On the piece below I used one folded cord attached to the pendant rings with a lark's head knot and coil crimp ends at the clasp.

Note:
Although I have stipulated bead and ring size sizes the technique can be used with other sizes to give different effects - have fun and experiment!
I love this!!!
ReplyDeleteI am going to do this one. Thanks
ReplyDeleteBloody brilliant! I have about a billion and one buttons and hands that don't want to sit still....I will be doing this one. Possibly tonight.
ReplyDeleteGreat idea and brilliant effect - thank's for sharing!
ReplyDeleteGreetings from Austria, Michi
Thanks. Just got in an order of waxed linen (plus some buttons), so away we go.....
ReplyDeleteThank you so much for the tutorial. It is something I am going to try. :)
ReplyDeleteAwesome Tut!I thought we had to open and close all those jump rings..Whew!
ReplyDeleteCan't wait to make one!
Love it...thanks for sharing!!!!!!
ReplyDeleteThank you for the useful tutorial =)
ReplyDeleteSo easy and very cool, Lesley. Brilliant! Thanks, I'm going to try this.
ReplyDeleteabsotively positootly fabtabulous....I love it such a unique design ty for sharing
ReplyDeleteWow!!! So pretty and so very very simple!
ReplyDeleteNice! Thanks for sharing!
ReplyDeleteNice tut, thank you for making it so clear and easy. I hope you don't mind if I Pinterest it for the future.
ReplyDeleteThis is an awesome design. I love combining seeds and metal!
ReplyDeleteFab idea! And pretty as well. Thanks! Love it
ReplyDeleteJenni
So simple, and yet so effective - thanks for sharing:)
ReplyDeleteThank you! This is so cute and it looks to be pretty quick. I will be making some of these.
ReplyDeleteThe simplest ideas are always the most elegant. Thanks for sharing, Lesley!
ReplyDeletelove this idea!
ReplyDeleteWhat a wonderful idea. Thank you for sharing it.
ReplyDeleteLesley...this is an amazing design that I cannot wait to try! Thanks so much for sharing!
ReplyDeleteLesley---you continue to amaze me with your ideas! What a fun idea. Can't wait to try it.
ReplyDeleteLooks like such fun - I'm going to give it a try this afternoon! Thank you for taking the time to make the tutorial and for sharing with us!
ReplyDeleteThis is super cool! Thank you for sharing, I think I am going to have to try this very soon!
ReplyDeleteWow, how come I can never think up this way cool stuff??!! Thanks so much for sharing.
ReplyDeleteBeautiful, yet so simple! Appreciate your sharing!
ReplyDeleteSeriously wonderful! Love the effect.
ReplyDeleteI love this and just bought the supplies to try it!
ReplyDeleteAbsolutely love it!
ReplyDeleteThank you for sharing this wonderful tut .... can't wait to try it! I'm just getting back into beading ... can you suggest an online source for the jump rings and buttons? Thank you!
ReplyDeleteMichele
Absolutely amazing and beautiful! I am so glad I found you. Profile was a huge plus too :)
ReplyDeleteThis is the best innovative use of jump rings I have come across!
ReplyDeleteWhat a simple and fabulous idea...will bwe giving it a go for sure...thank you!
ReplyDeleteThis turned out great! Thank you for the tutorial. What a stroke of genius!
ReplyDeleteLove how this looks!! Thanks for the tutorial!
ReplyDeleteHow pretty is this! Love the tutorial. Just popped over from the Beading Gem! Good JOB!
ReplyDeleteGreat Tute I came over from the Beading Gem and reposted on google+. I also learned what my given birth name means, thanks.
ReplyDeleteWonderful tutorial! Thanks!
ReplyDeleteVery nice bracelet and I usually don't like jump rings in jewelry
ReplyDeleteSo beautiful! Thanks for a fab tutorial - what a cool design, and I love your color palettes on these too pieces as well!
ReplyDeleteLOVE this and can't wait to try it!!! I have some buttons I haven't known what to do with. Love your blog as usual Pearl.
ReplyDeleteCarol
Wow, so original and pretty!! Thank-you for the share.. I'm gonna make this one for sure!!
ReplyDeleteWow! This is great, I love it. And so simple, that makes it even better. I will definitely be trying this. Thank you for sharing your wonderful tutorial.
ReplyDeleteThis is a clever idea and very cute! Thank you for sharing your tutorial.
ReplyDeleteWow...so simple but result is wonderful!!! Thanks for sharing. I will be making some of these ..probalt today. :-0
ReplyDeleteThanks so much for sharing this!!
ReplyDeleteLOVE this, pinned it, hope you don't mind! This is a great solution for a wonderful button I was given in Cindy Rimmer's button swap. I have to give it a try!!
ReplyDeleteVery nice and so simple! I like using jump rings in my designs as well. Just came over from the Beading Gem.
ReplyDeleteThis comment has been removed by the author.
ReplyDeleteVery nice bracelet and very clever tuto. Thanks for sharing
ReplyDeleteMade it last night. It came out beautifully. Although I did have to reclose all the jump rings that I had to make a cleaner match. I think copper jump rings are a big more difficult to work with.
ReplyDeleteGreat idea...thank you for sharing this.
ReplyDeleteHa! the addictive pattern :) I've +1'd this on my google as well :)
ReplyDeleteThis is fabulous!! Such an easy concept,but looks so intricate when made. I just made 4 of them and I am HOOKED! You can use any kind of bead, as long as the holes big enough. Thank you for this wonderful tutorial. Well done!
ReplyDeleteBrilliant idea, I will certainly give this one a try.
ReplyDeleteThanks for sharing
Thanks so much for this so well done tutorial to make these beautiful bracelets! I can't wait to make one!
ReplyDeleteSuch a beautiful idea. Thanks a lot for sharing. Will definitely try out as I just got some wonderful beads.
ReplyDeleteMarsela
Awesome pattern and great tutorial. You have an excellent sense of color.
ReplyDeleteJanet
Gorgeous and clever.
ReplyDeleteGreat tutorial and beautiful bracelet.
ReplyDelete~cryssT
Great tutorial and beautiful bracelet.
ReplyDelete~cryssT
What a great design! Great tutorial. Thanks
ReplyDeleteThank you.I have ideas now.Love and Hugs to you Tanya
ReplyDeleteThank you so much for sharing this! So simple and yet so intricate looking! Thank you!!!
ReplyDeletesaw the one Pips Jewellery made - it's lovely! Has such a nice weight and drape to it! Let's hope I've got enough jumprings in the house - can't wait to try it! Thank you so much for sharing it.
ReplyDeleteMeridy on FB pointed me to this after showing her own pieces that you inspired. I have been going a little nuts with this and using bigger beads with 1mm leather to make bracelets and necklaces for Christmas presents. You really gave me a jump on those. Thanks so much for the great idea and tutorial that made it so simple.
ReplyDeleteI've been wondering how to do this...Thank you so much for sharing it! Now the cord I have has purpose!
ReplyDeleteThanks for the great tutorial. I made a necklace from it and I love it...I'm going to make a bracelet next. Thanks again!
ReplyDeleteWhata great discovery I have made today. Not only this tutorial but of you and your work. Thank you!
ReplyDeleteThese are beautiful, and I've never come across a more simple tutorial - thank you! BTW, LOVE your color choices; gorgeous!
ReplyDeleteI am definitely making one of these! The best part is I don't have to purchase a thing! Thank you so much for sharing!
ReplyDeleteThis is one great tutorial. I want to feature this to our blog someday if there is an available slot.
ReplyDeleteDiybeadingclub.com
Diylessons.org
Handmade-Jewelry-Club.com
oh my! These look addicting! I'll be sharing this one with my daughter!
ReplyDeleteI just made it! It turned out great. Thank you for the tutorial and the inspiration. :)
ReplyDeleteLovely, I saw the bracelet alot lately, read there is a tutorial, and finally got to it (thanks to your partner's soup article :)) I must try it, I love the look! Thanks for sharing!
ReplyDeleteI love it! Simple and unique, thx for tutorial! Greetings:)
ReplyDeleteI love this! Thanks so much for sharing. Definatly going to play around with this...so pretty.
ReplyDeleteThis looks great - one I really must try - thank you!
ReplyDeleteCarrie.
Love this technique!!! Thank you for posting the tutorial on how to create something like this! =)
ReplyDeleteI made a bracelet using this technique today and i LOVE it! I had Turtorial Day in my studio today and I hope to blog about it soon (with pics). I really love the look!! Thank you for the inspiration and technique.
ReplyDeleteSo cool! Gracias!
ReplyDeleteI just finished mine and I am so very pleased with it! Thank you for such a brilliant design!!!
ReplyDeleteI love this design! So clever. Thanks for sharing this detailed tutorial.
ReplyDeleteThanks so much for the tut! Can't wait to make one!
ReplyDeleteMerci superbe ...
ReplyDeleteMerci beaucoup ... c'est adorable.
ReplyDeletePuca
Merci superbe ...
ReplyDeletemerci superbe :))
ReplyDeleteexcellent tutorial...sweet bracelet, I am looking forward to creating...excellent use for old buttons and so portable. Excited.
ReplyDeleteI have got to make this its brilliant. :)
ReplyDelete¡Lovely!
ReplyDeleteKind regards!
looks amazing xxx
ReplyDeleteHi Lesley~ I highlighted this idea in my "Pinterest Monday" blog post and provided you name credit and a link back to your original post. Thanks for sharing. http://ttedesigns.blogspot.com/
ReplyDeletei sooo gona do this love it
ReplyDeleteYippee an easy one and really cute too . Xx
ReplyDeleteFantastic, just made one, looks great, thank you
ReplyDeleteJust made one, looks fantastic, thanks for sharing the idea!
ReplyDeleteI was just making a bracelet when I was pointed in your direction. I love this design. It will be next on my to do list thanks for sharing xx
ReplyDeletei love this!!! going to make one today :D :D
ReplyDeleteLike all ideas this is so simple yet gorgeously effective.
ReplyDeleteThis bracelet is brilliant - and looks so lovely when finished. It is also easy to make and easy on the pocket.
ReplyDeleteI made four of your bracelets over the weekend, and I've ordered beads and jump rings to make more. The necklace is also on my 'to make' list , I know there are some nice metal celtic knots in my stash.
My daughter has already grabbed one, lets hope hers friends like it so I have a good excuse to make more!!!
Hands down BEST tutorial and amazing pattern!
ReplyDeleteLove this bracelet, Thank you for sharing this with us. I am going to have a go at making the bracelet. I have just bought some fancy jump closed jump rings so these will be perfect. Thank you.
ReplyDeleteTina
Very nice, thanks for sharing! I am gong to do this bracelet!
ReplyDeleteI had never followed a tutorial before because they always seem so hard to understand and im not good at reading and following what it says but your directions were so easy and clear that I made three of these for gifts for coworkers last night and am going to make one for my sister for Christmas!THANK YOU for sharing!
ReplyDeleteBeautiful! I'm curious...what gauge for the jump rings and what size for the buttons (in general)? Thank you!
ReplyDeleteI'm a bit of a late joiner, but just wanted to say that I love your stuff and thanks for sharing this tutorial as I wondered how these bracelets were done! Hope you have a very happy and prosperous New Year! x
ReplyDeleteLesley this is beautiful, such clear instructions on how to make it too. Thank you! Karen x
ReplyDeleteGreat! Thank you for sharing! Hugs, Doris
ReplyDeleteWow, that is cool! Have to try this!
ReplyDeleteBrilliant tutorial, thanks so much for sharing :)
ReplyDeleteThe macrame knotting is amazing, had a look for the knotting wire but can't find any other than on ebay on the search, any tips??
ReplyDeleteThank you for the wonderful tutorial.
ReplyDeleteHI Lesley, loved the macrame knotting, gave it a try with some wire I had and the clamp was my knees lol!! It turned out not bad, pics tomorrow. Thank you for the tutuorial and the tips you are just fab x
ReplyDeleteThank you Lesley for being so generous and also for taking the time to share this fantastic technique. The results look so amazing and yet the technique is quite simple - when you are shown how to do it! Thank you!
ReplyDeleteGreat tutorials and very easy to follow,thank you for sharing your gorgeous designs too.think I will become addicted lol!! x
ReplyDeleteReally lovely work. Thank you so much for sharing your talent with us. Although I'm fairly new at working with wire, I was well versed in macrame in the early seventies, so that might help me some.
ReplyDeleteBoth tutorials are wonderful. I haven't ventured into wire work but those delightful wire macrame earrings might just get me to do it. The jump ring bracelet is so simple but looks just dynamite. Thanks for sharing!
ReplyDeleteLove this and finally made one today!! Instructions very easy to understand and pictures helpful! Thank you for sharing!!
ReplyDeleteWhat great tutorials really want to try the earrings so all I have to do is get a vice.
ReplyDeleteThank you for the tutorials. Heard about it on tv today
ReplyDeleteThank you for these tutorials love both. I heard about them on tv today
ReplyDeleteWow It's lovely! Sure I will try to do it very soon! Thanks for sharing!
ReplyDeleteI just made the bracelet!! #winning#Christmas presents early-thank you :)
ReplyDeleteBeautiful! Thank you.
ReplyDeleteLove both these projects! I can't wait to try them! Thanks so much for sharing!
ReplyDeleteGreat tutorial.I tried knitting with wire but doing macrame will be great too. Give it a try soon. Thanks for sharing.
ReplyDeleteI love the seed bead and jump ring bracelet. Thank you so much for your generosity. I definitely want to try this with all kinds of beads.
ReplyDeleteAbsolutely brilliant! I can see about a million variations of beads and cord used and just can't wait to get started. Thank you for sharing your wonderful work. :)
ReplyDeleteMuy bonito gracias por tu explicación. Besos.
ReplyDeletesoooo amazing thank you for the tutorial
ReplyDeletesoooo amazing ...thank you for the tutorial!
ReplyDeleteLove the necklace and bracelet. What size beads and jump rings did you use for the necklace with the pendant?
ReplyDeleteAwesome. Love this... Thank you so much for sharing!!
ReplyDeleteReally awesome tutorials with great techniques!! I had never heard of wire macrame before so I am really looking forward to try it and love what you have done with the jump ring and cord
ReplyDeletefantastisc!! thankyou
ReplyDeleteGreat tutorial. Thank you
ReplyDeletea huge thank you for your tutorial is very well said
ReplyDeleteJust found your tutorials here - wow, what fantastic ideas! Thank you so much for sharing!
ReplyDeleteLove, Love, Love your work. Those flower earrings are just too adorable
ReplyDeleteI've tried to find the color beads you use on the JumpRing/SeedBead necklace, but none of my local bead shops carry it it. Any chance you could give me the name of the mix you used?
HI Victoria - the beds in the necklace are: Myuki type 5-409FR Size 5 Matte opaque chocolate AB.
DeleteI used twisted jump rings for a bit of a different look. I love this bracelet. They had one displayed at my local bead shop, I set the beads aside and i was in the hospital for a week and had forgotten how to put it together. Thanks for saving me! :D
ReplyDeleteThank you do much for your fabulous tutorials. Someone had posted a picture in Pinterest so figured it out for a 3-wrap. Took a LOT of jump rings! Made it with lavender AB 6°s and ant. silver jump rings and button!! Total hit and feels so nivmce wearing it!
ReplyDelete